Skip to main content
Enable Networking for SQL Server Express
Enable Networking
- Open SQL Server Configuration Manager.

- Using the left-hand navigation panel, select SQL Server Network Configuration, the select Protocols.

- Right-click Named Pipes, then click Enable.
- Right-click TCP/IP, then click Enable.
- Double-click TCP/IP, then click the IP Addresses tab.
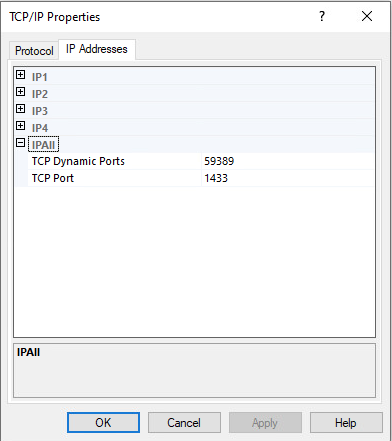
- Find the IP Address you want SQL to broadcast on, then set the TCP Port value to 1433.
- If you would like to broadcast on all interfaces, scroll down to the IPALL group and set the TCP Port to 1433.

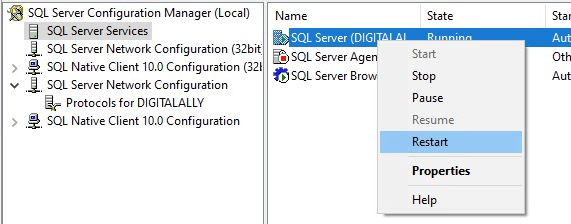
- On the left-hand navigation panel, click the SQL Server Services group.
- Right-click the SQL Server instance then click Restart.

- Finally, double-click the SQL Server Browser service.
- Under the Service tab, change Start Mode to Automatic then click Apply,
- Under the Log On tab, click Start, then click Ok.
Create Firewall Rules
- Open Windows Defender Firewall with Advanced Security.
- Click the Start button, then type Advanced Security.
- Click Windows Defender Firewall with Advanced Security when it appears.

- On the left-hand navigation pane, click Inbound Rules.
- Click New Rule... on the right-hand Action pane.

- On the New Inbound Rules Wizard, click Port then click Next.
- Verify that TCP is selected and enter 1433 into the Specific Local Ports textbox.
- Click Next.
- Select Allow the Connection, then click Next.
- Leave all the networking groups selected, then click Next.
- Give the Rule a descriptive name. Example: SQL Server TCP Ports
- Click Finish.
- On the left-hand navigation pane, click Outbound Rules.
- Click New Rule... on the right-hand Action pane.

- On the New Outbound Rules Wizard, click Port then click Next.
- Verify that TCP is selected and enter 1433 into the Specific Local Ports textbox.
- Click Next.
- Select Allow the Connection, then click Next.
- Leave all the networking groups selected, then click Next.
- Give the Rule a descriptive name. Example: SQL Server TCP Ports
- Click Finish.


No Comments